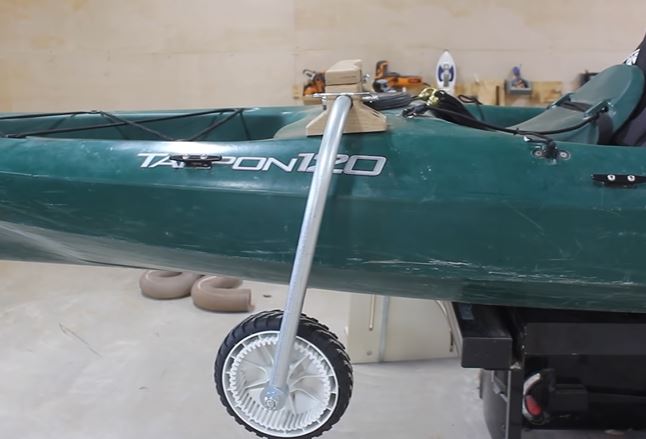
Imagine that you have a large and heavy kayak that is difficult to transport. And what can help you with that? The answer is simple. Your kayak needs landing gear. Landing gear will help you with launching and landing your kayak and aid in transporting the kayak on land.
On the other hand, one thing that can bother you is buying this gear because it is expensive and not everyone can afford it. Hence, it is best to go DIY if you are good at making things at home with your hands. In this way, things can be easier for you.
In this article, there will be a detailed guide that will help you make the perfect landing gear for your kayak. I will look at two ways of making DIY landing gear for your kayak.
To implement the first idea would require more effort and time. At the same time, the second DIY idea is simple and takes minimal time. Therefore, if you want a hassle-free method, follow the easy approach. In both cases, you will have a landing gear that works best for your trip into the water.
How to Build a DIY Kayak Landing Gear
There are many options available regarding landing gear, so you can easily get one. DIY gears, on the other hand, are extremely affordable. Also, the good thing about making landing gear at home is that the materials are easily available and perform just as well as traditional gear.
This first DIY is a little complicated, but on the other hand, if you are good at making handmade things, it will be a piece of cake for you. Now let’s go through the instructions and things you need to bring this landing gear to life.
What Items and Tools Do We Need To Make DIY Kayak Landing Gear
The complete list of materials that you need to get this plan to work is listed below:
- Two wheels. You can, for example, use SINJEUN wheels or other alternatives. But keep in mind that the bore must be 1/2 inch.
- 4 pieces of Wire-Lock clevis pins.
- 2 pieces of SteelTek 3/4-in Silver Galvanized Steel Structural Pipe Fitting Rail Support.
- 4 pieces of SteelTek 3/4-in x 90-Degree Silver Galvanized Steel Structural Pipe Fitting Short Tee.
- 3 pieces of 3/4 galvanized pipe. I recommend that you buy longer pipes so you can cut them to your desired length.
- 2 pieces of 1/2 galvanized pipe. They will be used as axles for the wheels, so make sure this tube is threaded as we will need to bolt the wheels.
- Drilling machine.
- Silicone washers 1/2 inch.
- Marker.
- Metal cutting saw (it can be a hand saw).
Remember that you can use alternative tools, but make sure to use the same material to ensure that the process goes smoothly.
Step-by-Step Instructions for Making a DIY Kayak Landing Gear
The first and foremost step is collecting everything you need to make the landing gear. Make sure to inspect your kayak and select wheels that will fit it. Knowing whether the wheels can handle the kayak’s weight is necessary. Once you are done with this process, start construction and installation.
Step 1: Select the Right Centerpieces
The first step in making DIY kayak landing gear is to select centerpieces that are the correct size for your kayak. I pointed out that you can choose SteelTek 3/4-inch silver galvanized steel structural pipe fitting rail support, or you can choose something similar.

The pieces are usually rough on the inside, so it is better to smooth the edges with a filer. In this way, the crossbar will fit perfectly. Now, look for the place where you are going to fit the centerpieces on a kayak.
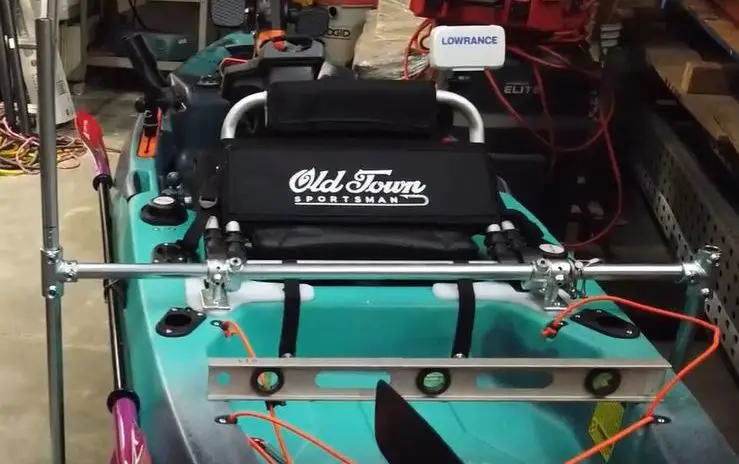
Step 2: Measure the Crossbar
In the second step, measure the crossbar. Keeping in mind the size of your kayak, leave 1 inch of space on one side. On the other side, you can leave more space if you mount a paddle or other equipment on the side.
Using a marker, mark the place where you will drill holes to set up the centerpieces. You will need them to solidify the centerpieces. Moreover, it is important to solidify the centerpieces. For this purpose, you can also use aluminum paper.
Step 3: Insert the Centrepieces
As the boat will spend a lot of time in the water, use silicon to sandwich the centerpieces and aluminum to become waterproof. Bolts or screws can be used to sandwich them together. It is recommended to use screws, as the bolts can come off sometimes, and you do not want to take any chances.
Step 4: Measure the Distance
The next step is to check the distance before installation. Put the crossbar through the centerpieces and measure the correct distance for installation.
After making sure that everything fits, use the drill machine and bolts to attach it to the kayak. As the crossbar is in a secure place, you are now ready to move on to the next step.
Step 5: Assembling the Wheel
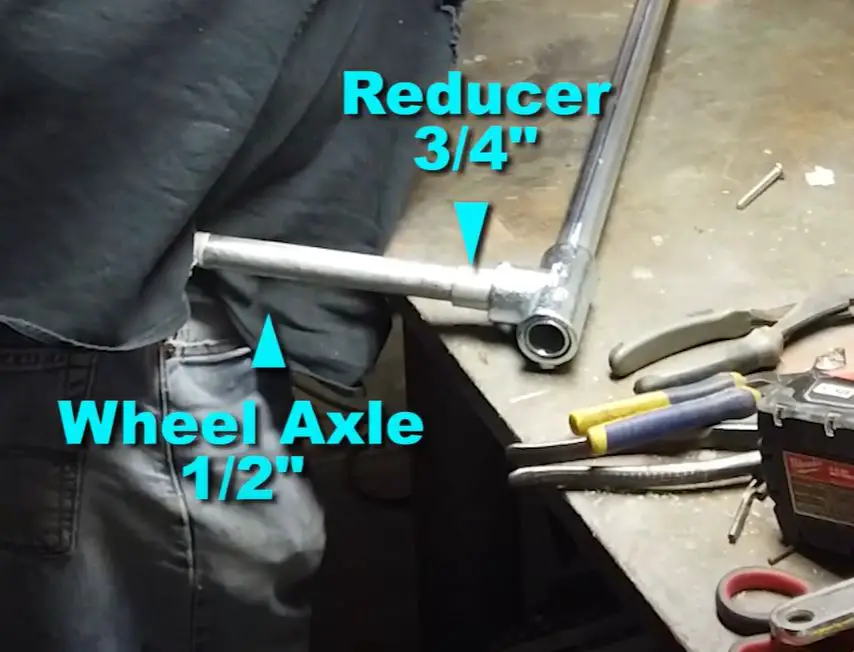
In the fifth step of making DIY kayak landing gear, you will need a wheel reducer to keep the wheel in place. You can cut a small piece of 3/4-inch pipe and put it over 1/2-inch pipe.
Next, we need to take a 3/4-inch pipe and attach a three-socket tee on each end. Keep in mind that you will need two 3/4-inch pipe tubes, one for each wheel. And one of these pipes should be longer than the other because it will serve as a lever to raise and lower the wheels.
Also, when you attach the three-socket tee to one end of the long tube, lower it down to create a lever handle. If you look at the picture below, you will see what I mean.
In the third hole of the three socket tee, we will insert the axle, on which we will put the wheel. In the end, everything should look like the picture below.
Step 6: Secure the Wheels
Before putting the wheel on the axle, place the washer on the axle. Now is the time to place the wheel and another washer so that the wheel is sandwiched between them. It is needed for stability and effective use.
Now we need to tighten the wheel. Keep one thing in mind: the wheel should have space to move. Measure the axle before to get a clear idea about the space. Repeat the same process for the opposite wheel as well.
Step 7: Drilling Permanent Holes
Once you have attached the wheels to the axles and assembled the entire side piece, put your kayak on a stand to better understand the measurements. You can use two buckets in the front and two in the back to lift the kayak to make it easier to see what the whole assembled structure looks like.
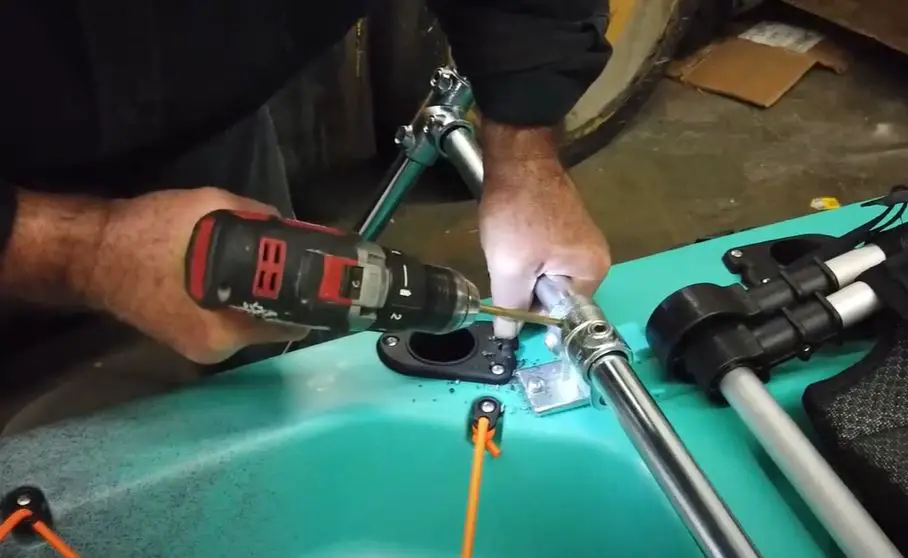
The main step is to join the crossbar and the side metal pipe, where the wheels are attached. You can use stainless steel or white bolts to permanently join them after drilling the holes.
Once you’ve assembled the entire structure of landing gear and made sure everything fits, you can find where to drill permanent mounts and join the bars together.
Step 8: Make a locking system
In this step of making DIY kayak landing gear, we need to make a locking system that allows us to lock the wheels straight down when we need to use the landing gear and that allows us to lock the wheels at the top when we don’t need the landing gear.
First, you will fix the gear in a vertical position and then drill a hole in the centerpiece. After you have drilled the hole, insert the clevis pin there. The clevis pin will lock the landing gear in the vertical position.
Once you have made a lock for the vertical position, it is time to make a lock for the horizontal position as well. To do this, fix the gear in the horizontal position and drill a hole in the centerpiece. You can also drill a hole in the other centerpiece if you want one to be a lock for vertical position and the other for horizontal position.
After that, the locking system for our DIY landing gear is complete.
Step 9: Examine Your Kayak
After you have completed all the steps, the last step is to test your gear. To make sure your gear works perfectly, lower the wheels and roll your kayak a bit on the ground. Once you have tested everything and everything works perfectly, your DIY landing gear is ready to use.
Next, I will write about another idea for how to make a cart for my kayak. This idea is much easier, the supplies and tools that you need are much easier to find and also, this idea is very cheap.
A Simple Idea on How to Make a DIY Kayak Cart
If you are looking for cost-effective DIY kayak cart ideas, then you’re at the right place. I have brought you the cheapest and easiest method to help you get a kayak cart. Also, you will face no hurdles if you have successfully made your kayak landing gear before.
Moreover, the ordinary kayak cart costs about $50. At the same time, we want you to get the same cart performance with a low budget. Hence, this DIY cart can be built for just $20 with simple and easy steps.
Before we dive into the steps, we must make a list of supplies needed for a smooth process. You will also get a tutorial video at the end of the guidelines that will help you make this budget-friendly kayak cart.
Tools and items we need
The tools needed for making a kayak cart are:
- Two Wheels
- One Scrap wood
- Washers
- Screws
- Metal Bolts
- Glue
- Rubber band (about the size of your kayak).
Guidelines For Making A Kayak Cart
The measurement of the kayak cart depends on the size of your kayak. Therefore, before starting the process, it is better to take measurements and buy scrap wood that fits the requirements.
The first step is to cut the scrap wood to make two vertical bars. In the next step, drill holes in the side of the bars so that you can fix the wheels. To secure the wheels, it is better to put the washer on first, then the wheel, and another washer to tighten the wheel. Use your screwdriver to hold it in place and see if there is any tension. If not, you are good to proceed.
Now, you have to join the two vertical bars with a piece of metal to make a place for your kayak. First, put bolts and screws in place to secure them in the right place. Although it is optional, you can also apply glue to ensure safety. Another alternative is to use silicon cardboard between the two bars and add glue to make them water-resistant. On the other hand, take the measurements correctly so that the kayak fits perfectly.
In the last step, you must attach a hook at the top of the wood bars so the rubber can be put in. Measure the vertical bars accurately according to your kayak so that there is tension in them. The tension will further help your kayak stay in place.
Furthermore, I’ll leave a tutorial video, which can be helpful when you start making a DIY kayak cart.
Conclusion
Being a nature and fishing lover, you must have traveled on a kayak and explored your passion. If this is the case, you should also take great care of your kayak. The kayak landing gear is what will help you transport your kayak.
This is why I have discussed making DIY kayak landing gear and a cart for your kayak. These two DIYs are good investments since they are worth making and are super manageable if you try them at home.
Also, if you like DIY ideas, you can read an article about how to make a DIY cooler for a kayak. Below, I leave you a link to the article.
A step-by-step guide on how to make a DIY kayak cooler.
I hope you have enjoyed these affordable methods and are ready to try them soon!