Inflatable kayaks are improving in reliability and performance. The fabrics used are robust and can survive damage from rugged use.
However, leaks from rips and punctures can occur with inflatable kayaks. You need to maintain your inflatable kayak regularly to prevent accidents in the water.
There are several situations that can cause rips and punctures in inflatable kayaks, and we’ll go over them to help you reduce leaks.
And look at how to find and fix a leak in an inflatable kayak. We will go over the basic procedures for locating leaks in your inflatable kayak.
I will show you tips for finding leaks, marking the punctures, preparing it for repair, patching the punctures, curing the glue, and testing the repairs.
How To Find A Leak In An Inflatable Kayak
After you inflate your kayak to the recommended pressure for a paddling adventure, you have a few options:
- Listening for the escaping air.
- Using soapy water.
- Submerge it in water.
Each way has its advantages, but the list also works as a sequence. If the first step doesn’t work, you can go to the next step to find the leaks.
Listen For Air Escaping
The first method in our guide on how to find a leak in an inflatable kayak is to listen for air escaping.
For this, you need to find a quiet location. I know, it can be a bit tricky, but you need to turn off all machines, generally things that make whirring and whining noises.
So with your fully inflated kayak, put your ear and cheek very close to the kayak to not only hear but also feel the escaping air.
Scan through the kayak, divide it into an imaginary grid, and listen for leaks. Work through the imaginary grid step by step.
Once you hear air leaking, squeeze the kayak at that point to exaggerate. Then mark it and continue systematically.
If you can’t detect the leak, you can use the method described below.
Use Soapy Water
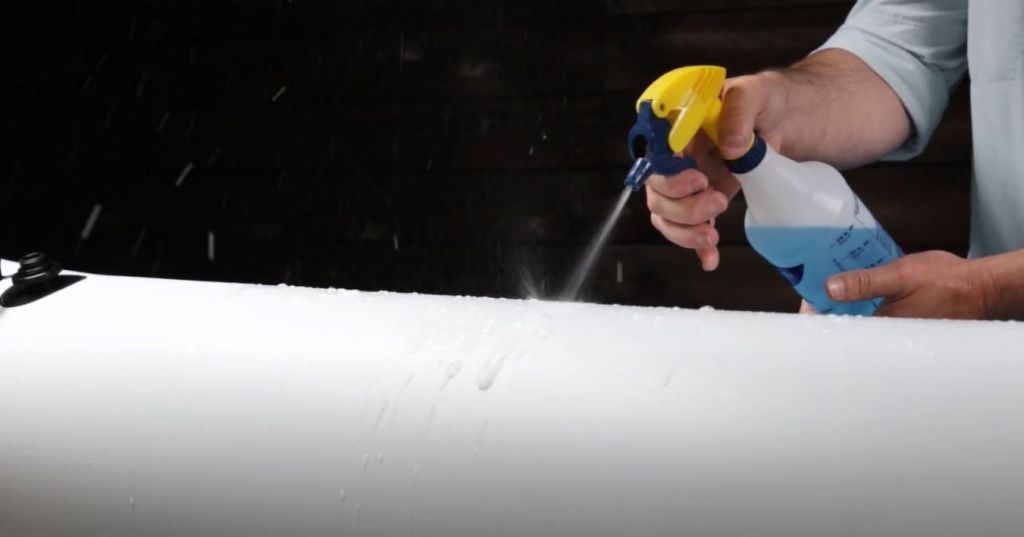
Again, after you inflate your boat, use a soap-soaked cloth or a spray bottle to spread it over the kayak. Again, cover the kayak systematically, grid-by-grid.
Once you start covering your kayak with the soap solution, you need to watch the bubbles form. Where bubbles form, there is an air leak.
After you’ve discovered the hole, tear, or rip, mark it with a pencil or marker by drawing a circle around it.
Submerge The Kayak In The Water
Next, try to immerse it in water. Of course, you need a body of water that is wide, long, and deep enough to contain the kayak. Also, the water must be clear.
Bring along a diving mask so you can see underwater; this is very important.
Again, inflate your kayak and float it on the clear, still water. Put your diving mask on, take a deep breath and plunge in.
You will need a lot of force to push the kayak down. When underwater, look up and around for small bubbles escaping from the underside of the hull.
Once you see bubbles, you should be able to trace the leak again, following the imaginary grid.
If and when you find them, use a grease pencil or chalk that can work underwater to mark the spot of the hole.
Don’t forget to come up for air.
Video On How To Find A Leak In An Inflatable Kayak
I’ll leave a very helpful video for you below with a good explanation of how to find a leak in an inflatable kayak.
Tips To Easily Find A Leak In An Inflatable Kayak
Finding leaks can be straightforward if you use these tips.
- Start at the seams. More often than not, it is the seam that is leaking. The seam can come loose on its own, or damaged seams can come from the factory.
- Check the valves: Also, valves could be faulty or have dirt and debris trapped. So it’s also very important to check all the valves looking for air leaks from your inflatable kayak.
- Soap and water solution: combine water and liquid soap. Some recommend a 50/50 mix, but this could be rather wasteful. Instead, use dish soap as it tends to lather nicely and also won’t be too harsh for your kayak’s fabric.
You can use a spray bottle to apply the soap mix, or you could use a sponge. Make sure to use a soft sponge, not an abrasive one.
- Mark the punctures: search for holes, rips, and punctures, and when you find them, you need to mark them with either a pen, marker, or chalk. Use something that will not cause another tear.
Chances are that you have more than one hole, so you need to keep searching. Marking them as you find them will help you remember where they are.
Steps On How To Fix A Leak In An Inflatable Kayak
Once you’ve found the location of the leak or puncture, it’s time to fix it. There are four steps to follow, and the first step is to find the right repair kit.
Step 1: Choose The Appropriate Repair Kit
To fix a leak in an inflatable kayak, first you need to know the material of your kayak. Inflatable kayaks generally have two types of materials: PVC and Hypalon. PVC is a lightweight and flexible plastic.
For kayaks, PVC is wrapped in nylon or polyester fabric for increased durability.
Hypalon is a synthetic rubber with extra layers of neoprene and is a more durable material than PVC. Essentially, more expensive kayaks tend to be made from Hypalon, while cheaper ones are made from PVC.
You need to know what material your kayak is made from to choose the right repair kit and adhesive.
It is also possible to find large pieces of the same material as your kayak to work with.
Once you have located your leak(s) and have your repair kit, you need to find out if the rip is larger than about 75 mm.
Why? A hole larger than 75 mm needs to be patched from the outside and inside. Smaller rips can be patched only on the outside.
Step 2: Clean And Dry The Area Around The Leak
Use a soft cloth to wipe down the area around the leak with a solvent, which activates the adhesive. Don’t use any unapproved solvents so as not to damage the fabric of the kayak.
Make sure there is no dirt and debris, as well as soap or water, which can spoil the integrity of the bond.
Lastly, make sure the kayak and patch are dry as well.
Step 3: Apply The Repair Material
There are a few recommendations and safety precautions before you start repairing.
I recommend wearing gloves while mixing and applying the adhesive. It is also best to do the repair in a well ventilated area.
Now let’s move on to the process of applying the repair material to the kayak to fix a leak in an inflatable kayak.
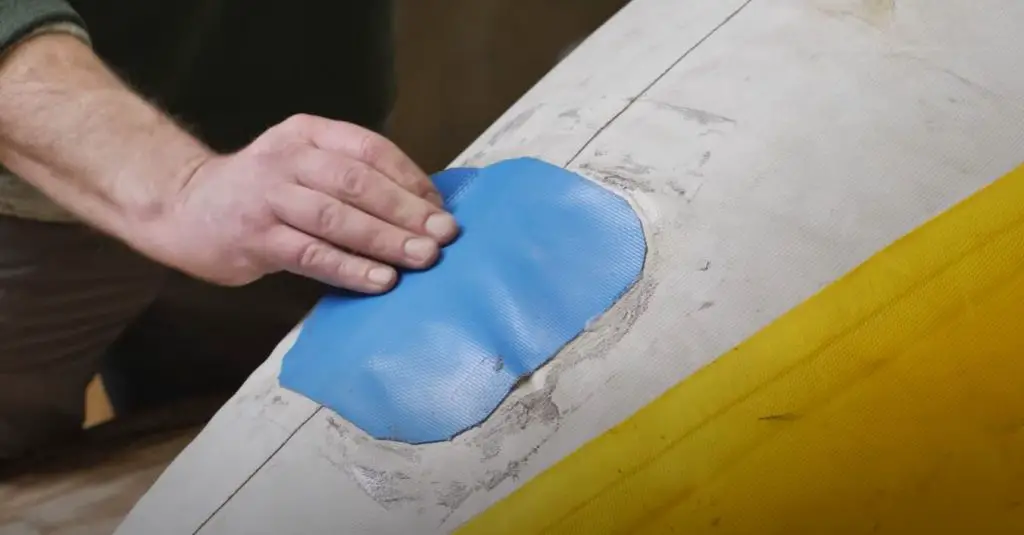
- Cut out a circular patch; circular patches are better than rectangular patches as the edge may not bond well and tear out in the future.
- You need to make the patch about 30 to 50mm wider than the puncture in all directions. So that it covers the puncture adequately.
- Score the patch and the area around the puncture or rip with sandpaper. This is just to create friction so that the glue can work better. Note that for sandpapering, you should only remove the shine for a matte finish rather than expose the rubber or PVC underneath.
- Clean the patch with the solvent rated for the material of your kayak, whether it is PVC or Hypalon (rubber-based).
- Then apply the adhesive from the repair kit to the patch and the area to be patched on your kayak.
- Apply the recommended number of coats of the adhesive. For Hypalon, it is usually about 3 coats, while PVC is about 2 coats.
- Wait the designated time (10–30 minutes) after each coat is applied. Each adhesive brand has its own recommendation. Follow the instructions that come with yours.
- Make sure the room is not too warm or humid.
- Follow the instructions for the glue’s state to attach the patch. You can do a knuckle test, where you use your bare knuckles to make an indent in the adhesive to see if it sticks to your skin or not. If it sticks, then the glue isn’t ready; check again in a few minutes. If it doesn’t stick and the glue presses in, then it is ready for application.
- Once the glue is ready, attach the patch to the marked puncture. Put the patch in place as smoothly as possible, such that no air pockets form.
- Then press the patch into the kayak with a roller with as much weight as you can. This helps the glue hold the material together and removes air pockets. Rolling on the patch with great pressure helps remove any air pockets you may have missed and activates the bonding of the glue.
- Clean any excess adhesive from the freshly patched kayak with the solvent. Don’t use water or any other solvent that is not meant for the type of fabric your inflatable kayak has.
- Wait 24 hours to cure or the recommended curing time of the kit’s instructions. The time depends on the glue mixture you are using; some glue mixtures could take less time.
Also below, you can see a video on how to fix a hypalon boat.
And in the video below, you can see how to fix a PVC and urethane boat.
Step 4: Test The Repair
The last step in our guide on how to fix a leak in an inflatable kayak is to test the repair.
After the patched kayak has had 24 hours for the glue to cure, reinflate the boat to normal pressure. Follow the same procedure for checking for leaks.
First, see if the kayak holds normal pressure for several minutes. If the pressure is consistent for several minutes, you can now go paddling.
If there are still leaks, you will need to repeat the process and be more thorough when finding the leaks, making the patches, applying the adhesive, and fixing the patch.
Remember to get rid of all air pockets.
How To Prevent Leaks From Occurring In The Future
The situations that tend to cause punctures are transporting your inflatable kayak and packing and unpacking it from storage. Also, climbing in and out of the cockpit as well as the weight of your gear.
Salt water and chemicals from various bodies of water can wear down the material of your inflatable kayak, as can rocks and sharp debris in bodies of water.
But you can reduce leak damage by maintaining your kayak regularly. Do routine inspections for wear and tear. Cleaning and storing the kayak properly can go a long way.
Rinse them thoroughly before scrubbing them with soap. Don’t drag your inflatable kayak over the ground or rough terrain.
Inflate and deflate your inflatable kayak properly. Gauge the pressure to see that it is inflated optimally.
Fold the kayak properly and store it in a cool, dark, and dry place.
Avoid heat or fluctuating temperatures and the sun’s UV rays. With these measures, you will see fewer punctures and damage.
This is what you should do to prevent leaks from occurring in the future.
Summary
Finding and fixing a leak in an inflatable kayak is not difficult.
Remember, you want to first find all the leaks. Follow the tips for finding the leak by starting at the seams, cleaning, and checking the valves.
Then you want to choose the right repair kit for your inflatable kayak, prepare the kayak by cleaning it, apply the repair patch, and then test the fix.
Then, you would want to make sure you take better care of your inflatable kayak when transporting it, paddling (avoid rocks and sharp objects), packing it up, and storing it away.
Lastly, don’t forget to have fun. Inflatable kayaks are robust, and you shouldn’t live in constant fear of puncturing them. If you do have a leak, now you know how to find and fix a leak in an inflatable kayak.